Friday, March 21, 2025

Yep! My final assigments links

 Ok. This is THE END...😄 was a long way, but I must confess that it was more fun than I initially thought.

Here are my CCR and Film Opening links!

CCR1

https://drive.google.com/file/d/1Qlt1cRXvKqxRlbg-CyXAjhUYxX1uP1Dr/view?usp=sharing


CCR2

https://drive.google.com/file/d/1nudccn7cG8jE3LNJy7ky83LkNCgcSzTR/view?usp=sharing


OPENING 

https://drive.google.com/file/d/15Rk1JjneCBgLVK3DZLIn2NhGkJGd2eRf/view?usp=sharing


I hope that you like them! 


Special Thanks to:

ELVIA HERRERA and NATHALIE HERRERA (camera) (CCR)

NATHALIE HERRERA (  Final Cut Tips) 

DANIEL VELAZQUEZ  (CCR)


Thursday, March 20, 2025

The End

This is it!! The End...

After almost 2 months of working, I completed my Cambridge Portfolio Project and Film Opening. This project took up so much of my time, and I can't believe it's over. We were planning our scripts and coming up with our stories yesterday, and now it's all done. 

Every shot. Every clip. Every blog. After 8 weeks of posting, it's all over. This project was not easy. Especially doing it by yourself. When I began filming my movie, it took me 2 days to have 2 good clips. But as time passed, I started to get the hang of it, and with help from my aunt, cousin, and mom, I managed to finish a project I initially thought would nearly be impossible.

One of the things that helped me the most was the blog schedules. Doing these 4 blogs every week helped me stay on schedule with the project and be able to finish everything without a time crunch. It also helped me develop ideas and gave me easy access to all my work if I needed to re-check something. 

Another tool that helped me complete this project was the tripod my aunt let me borrow. This allowed me to film by myself and quickly get ahead in the filming process. Without it, I doubt the film would have turned out the way it did. 

The most stressful part was the editing, as I had to sit next to my aunt for 2 hours as she revised every clip repeatedly to make them blend smoothly. Then, I started to do the corrections by myself and added the sounds, music, and effects.  The Foley part is always fun; including it in my post-production was great!

However, the thing I liked the most about this project was the freedom we had with it. Everyone has a different work rate, so some will be done with some stuff faster. The fact that Mrs.Stoklosa decided not to be on top of us with the blogs and the production made the project much less stressful and allowed students to develop ideas and work at their own pace. Knowing that just because I was taking longer to begin production didn't mean I was behind really took off some of the pressure while working on this project.

This will likely be my last post for the assignment. I hope you enjoyed my blog as I documented my progress on the Cambridge Portfolio Project.

Keep in touch, and thanks for reading!


Wednesday, March 19, 2025

CCR POST-PRODUCTION

 Hello there! 

It's time to write about post-production for my CCR. Since these are two media products, each has its own style and length. 

CCR1

The first one, which aimed to answer the first two questions, was done in an interview format, and for the editing, I used a show's presentation (which I created in Canva). 

The editing was cut by cut, and I used effects like Ken Burns to generate movement in each clip, such as camera moves or close-ups. I also used a title bar to identify the host and guest. 

Ken Burns Effect

Timeline

Caption's Bar


FONTS

Since Final Cut Pro has many options, I chose Helvetica Neue, regular, size 183, with a Lower Third Basic Logo option. This allowed me to add the show's logo, which I designed in Canva. I also inserted overlapping graphics and clips with information such as comments, research data, and part of my Opening Film. 


SOUND

I again used the copyright-free library that our instructor suggested for the music. The result was an almost 5-minute video that was quite good and summarized my opinion on the questions raised for this part of the project.  

Pixabay.com


Although this edition is longer than the opening film, it was more fluid because almost all the clips came from one scene with only four shots. I really had fun with this part! 

CCR 2

The post-production of my CCR2 was more demanding than the previous one. Although I only had two clips, the first with Victor Host's questions and the second with Victor's answers as director/actor, establishing the sequence and effects to fit within the film's screen was challenging.

It took me about two hours to finish this part. My aunt Nathalie gave me some tips that I had already used in editing the Opening, but in this case, the timeline had plenty of material to "insert into the screen."


I used the base clip, scenes from the film, photos from the production, and some sources I cited from the Internet.


FONTS


I used a different font from the Final Cut font library. I chose Din Condensed Bold in yellow with a font size of 228.


For the effects, I inserted the clips into the screen (a still shot captured with a tripod) and used transitions with a glitch effect to continue the mood of my Opening.


I reused my film to open and close the video, which turned out well.

The audio was an issue because I tried to create two different intonations for each character. Even so, I had to speed up some clips and add gain. I achieved this with the audio editing bar that Final Cut includes by default, which can automatically enhance the audio.


The music in the almost imperceptible background is the same one I chose for CCR1 from Bensound Gallery.


Post-production is my favorite part of the project. Good software can make a huge difference in editing, video, and audio effects.

In my next two posts, I'll reflect on this entire project (the longest I've ever had) and finally post the links to see the final result.

So, keep in touch. There are only two more days left.

Tuesday, March 18, 2025

CCR PRODUCTION

Okay, it's the final week. It's time to produce the CCR. This part of the project presents two videos answering our teacher's suggested questions. I'd been working on a couple of ideas the previous few days.

CCR 1 (answers to questions 1 and 2) 

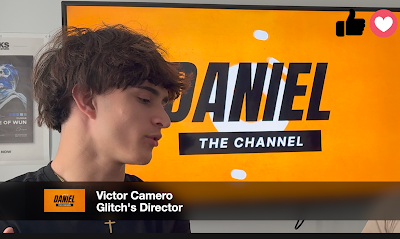
I did an interview format. It's an invitation to the director and actor of my opening (that's me!) to a YouTube show. My cousin Daniel Velazquez played the host and did a great job. We filmed on the same set where I filmed part of the opening, but we used my TV screen as the background. In it, I played a show ID I made in Canva and scenes from the Opening.


As a prop, I printed the show ID so Daniel could have it in his hand, as TV hosts generally do.


I included audience chat participation and generated the comment screens using Canva. I also designed some graphics to enhance the post-production.


These are some of the technical specifications:
  • Cameras: 2 iPhones. One moving and the other fixed on a tripod.
  • Microphones: Ambient
  • Lighting: Warm spotlight.
Although I wrote a script, we improvised a lot. I remember mentioning some sources from my research, and then we cut to re-film. It felt like an interview, and my cousin gave it a lot of credibility.

CCR Part 2 (questions three and four)

 For the second video of my CCR, I decided to do something a little different. Interview me? 

I separated two characters—the host and Victor—behind and on the screen of my film. The answers related to the last two questions our instructor asked for this part of the assignment.  So, with the help of a tripod and my mom, I recorded myself in two different positions but wearing the same costume in my opening.

Long Shot Victor Inside Screen 


Medium Shot Victor outside screen


I did need a script, and the help of Cap Cut, an app that includes a teleprompter option, was very valuable. 


SCRIPT


Now,  post-production is the big challenge. I'll edit with Final Cut here. I'll tell you more in the next post.

Keep in touch!


Friday, March 14, 2025

CCR 4: How did I integrate technologies—software, hardware, and online tools—into this project?

Hi again! Happy Friday. Yep, I almost finished... Today, I posted about question number 4:

How did I integrate technologies—software, hardware, and online tools—into this project?

To create Glitch, I first edited using iMovie and Final Cut Pro, allowing me to tune the pacing and add effects like slow motion. I also used video effects like black-and-white and coloring and a sound library to increase the tension.


Black and White filters 

Some sound effects that I used

I stored all the videos on my iPhone's camera roll and would sync it with my laptop and desktop to export the clips to FinalCut. This worked without issues, which I didn't expect since I would run out of storage from all the clips.

I filmed using my iPhone 13 camera and my mom's iPhone 16 Pro Max, ensuring that shots were stable while experimenting with different lighting techniques. Using a tripod was helpful because it gave me precise stability, and I filmed myself during some clips.

I also researched horror filmmaking techniques through YouTube tutorials and film analysis blogs, learning how lighting, sound, coloring, and framing can create fear.

The YouTube video How To Shoot a Horror Film (2020) states, "Low key lighting is a lighting technique for films that focuses on accentuating shadows by using hard source lighting in a scene."

With the use of LED light, I added some coloring effects that contrast with the black & white style of my opening. However, I could have used red lights instead of blue because this color is one of the filmmakers' favorites to increase the horror genre's mystery.


The editing process 'cut to cut' was important, and Final Cut Pro is friendly because it has the same platform as other easy-to-use software I know, such as iMovie. According to Krock, a Media Review and Collaborations Platform, editing horror is about the pace. Amina (2023) wrote: "It sets the movie's pace, telling the director when to build up the tension and give the audience a short break. By changing the speed and number of cuts, editors can make scary moments last longer or bring them on faster." I tried to follow this advice.

Additionally, I incorporated royalty-free sound effects from some websites ( suggested by my teacher) to enhance the mood and use eerie ambient noises. (In past posts, I told you about this.)

The Foley is always fun to have, so I did a couple of them using karaoke microphones, which gave my production some distortion noises to immerse the audience in the protagonist's growing paranoia.

Through this process, I've better understood the horror genre, audience engagement, and digital filmmaking techniques. Glitch is a modern approach to psychological horror, blending classic suspense techniques with today's digital editing.


In my next CCR post, I'll break down my idea to present the CCR part of my project.


Keep in touch!

Thursday, March 13, 2025

Group Meeting #2

Hi there!

Today in class, we met with different people to discuss our projects. I got paired with Vicky, Sofia, Ayden, and Isa. We discussed the themes and ideas of our projects and what we would do for the CCR.


To see all our projects, we used tstok.net, which Mrs.Stoklosa provided to see everyone's blogs by AICE number.  I was the last one to present the project and received great feedback from my team. In fact, they helped me fix a problem with my lighting, which made many of my shots have way better quality, especially shots with little light in them. 

We also discussed what editing software was the best for our projects. The 2 softwares we decided were the best were CapCut, and Final Cut Pro. If you are doing everything on your phone, CapCut is more uncomplicated and straightforward, but if the editing is done on a laptop, the best choice would be Final Cut Pro.

After discussing each other's projects and what genre they chose, we began brainstorming what we would each do for our CCR. Thanks to this discussion, I decided on an interview format.   My cousin will be the host, and we will simulate a YouTube live-streaming show.  The setting will be my room because almost all of my Film Opening Project takes place there.

This group meeting was beneficial. It gave me insight into my project and what others were doing, and I received advice on what I should keep and change for my film opening.

Thanks everyone!

Keep in touch.

Wednesday, March 12, 2025

CCR3. How did my production skills develop throughout this project?

Hi! I continued with the CCR.  This post is about question number 3 

How did my production skills develop throughout this project?

This project helped me improve my filmmaking, editing, and acting skills. I did the whole project alone, but I received collaboration from my cousin, Daniel, aunt, Natalie, and mom. They helped with camera movements and editing in Final Cut Pro ( I learned about using this software in the basic mode). Also, I improved on using camera angles with a tripod (some clips were filmed while I was acting) Lighting is also a skill that I need to improve on. One of the biggest challenges was maintaining the darkness of a horror film. The LED blue light in my bedrooms helped me achieve the eerie aesthetic. I changed the clips to black and white using Final Cut's coloring tools. The result was different but challenging because my initial lighting was blue and dark, and the shadows were projected differently.

However, I kept some clips in "color" to give the opening a different touch. Another use I made of color was with the titles that appear in red, which, according to what we learned in class in the color scheme unit, signifies danger, at least in the horror genre.


The final scene in the bathroom was one of the most thoughtful because I had to use a makeup product to make it look like blood on the floor. But I had to leave that clip in color to be noticeable. So, I divided it and was able to generate the effect. This may be one of the criticisms that those who have seen the film have made of me: Why that scene in particular? It looks "divided," but I wanted the blood to be noticeable in its real color.


One of the parts that gave me the most work (besides acting, which I had never done before) was post-production... I had a lot of material, and compressing it into 2 minutes while trying to preserve the original script was difficult, but not in vain; many experts describe this part of the process as magic. I was reading some blogs, and, for example, Kim Sarnoff published her point of view on this phase of cinematography in 7 Wonders cinema (2022), saying "that it's about synthesizing all the elements that have been gathered, created or designed during the whole filmmaking process". In addition, she mentioned that all the team members were involved in sound editing, special effects, color correction, grading, and editing.


So, the editing part was the biggest challenge, and I learned, among other things, that you need a lot of order and structure in what you are doing from day one to succeed in your final delivery. I enjoyed the sound design part. I used Foley to hint at the presence of something unseen and added effects from Final Cut's sound library, which is great. I also used music that I downloaded from no-copyright websites such as Pixabay and BenSound.

I am thankful to my cousin, Daniel Velazquez, and my aunt, Nathalie, who helped me throughout the process. Compared to my previous projects, Glitch required a more intentional approach to pacing and atmosphere, which helped me grow.

Yep! My final assigments links

 Ok. This is THE END...😄 was a long way, but I must confess that it was more fun than I initially thought. Here are my CCR and Film Opening...